Saturday, December 15, 2012

Week 14: Holiday Step and Repeat Banner

We're back on with celebrating the holidays with an annual ugly sweater party. This year with all of my Pinspiration, I wanted to make sure our home was all decked out as well. In addition to plastic candy canes lining the driveway, the pictures of ugly sweaters in our entryway and a hot chocolate bar, I wanted to make an area that we could immortalize our ugly sweaters in a photobooth-type fashion.

Our large windows in our dining room provided the area and some wrapping paper taped together provided the backdrop. First, I measured the width and height of the window, planning on being able to tape the final product on the window frame. Then I placed various pieces of wrapping paper on the floor, attaching them together with blue tape. I took a plain piece of brown paper and wrote "Happy Holidays 2012" at the top so when we took pictures, it said that at the top. The final touch was the bows that taped up after I taped my creation to the window frame.

For the party, we had a camera with a tripod set-up so we could take individual and group pictures. It's definitely something we'll do again for next year's party.

Next year I'll have to challenge myself to find uglier Christmas wrapping paper and make the "Happy Holidays" part a lot bigger.

(Thanks to my model, Schooner, in the photo!)


Friday, November 2, 2012

Week 13: Angry Birds Pumpkin for Halloween

It's been many years since I've carved a pumpkin so I wanted to make sure that the pumpkin my husband and I carved was awesome. Since we're still on an angry birds kick, we decided on that. It was a last minute decision so I pulled up what I could on Pinterest and found a picture with an angry bird outline photoshopped on a pumpkin. Shouldn't be too hard to freehand, I thought. And it wasn't!!

I had this picture displayed on my phone and sketched with a pencil first. Next came the punching to outline cuts and then came the actual cutting. The hardest part was cutting the lines thick enough that we could see light from a candle inside the pumpkin. That's where my husband's expertise came in. I think it turned out pretty well considering it was freehanded. It definitely made me miss carving pumpkins - I'm looking forward to next Halloween!

Wednesday, October 17, 2012

Week 12: Hard Copy of Daily Baby Record


As we were packing up our things in the hospital to take our baby boy home, the multiple nurses who came through each mentioned to us that we needed to keep track of how often (and how long) he was nursing,  hen he had a wet diaper, when he had a BM diaper, etc. They each said that the pediatrician would be asking for that information at the first doctor's appointment. 

I had seen a post on Pinterest about great apps for mom's and one of them was Baby Connect ($4.99 for your iPhone). Once you download the app you can track all of these things and more! It's awesome because you can designate others to login to the application (like your spouse, grandparents or other caregivers) so they can input the information into the same place as well. Even though you have to pay the $4.99 for each device the app is used on, you can login for free from any computer. 

Fantastic if all of your caregivers have smart phones or access to a computer 24/7 while watching your little one, but what if they don't? It's still important to me to have that information tracked, so I created a hard copy document that I can print off as I need to. I even put instructions at the top so each new caregiver knows how much to feed (or not feed) the baby and what other expectations you have as far as activities are concerned. You can download an example document here that you can customize to your child's name and criteria. (Simply click Ctrl + S when the preview pops up to download the original word file.)

This may seem like a more manual process, since you'll have to log the information back into the Baby Connect interface yourself, but at least you'll have the information logged and you don't have caregivers trying to remember how many wet diapers there were and how many ounces the little guy or gal has had since early that morning.

Monday, September 17, 2012

Week 11: Crib Dust Ruffle

I saw this tutorial for making a crib dust ruffle on Pinterest and wanted to make an Angry Birds dust ruffle for my baby's crib. First I purchased the smallest sheet set I could find (twin) and was going to cut it up and follow the instructions.

However, I felt like it was an ambitious task I was about to undertake considering how tired I was in the third trimester. So I improvised.

The sheet set was completely useful in its twin set state so before we put the mattress down, we just used the flat sheet as the dust ruffle. Not only was it a heck of a lot easier than sewing a dust ruffle (like the one pictured top left), but now we can reuse the twin sheet. Some may call it cheating or a short-cut... I call it efficient and achievable. :)

Sunday, September 9, 2012

Week 10: Hospital Goody Bag for Dad

Once my bag was packed in preparation for going to the hospital, I put together a special bag for my husband based on something I saw on Pinterest. Yes, it's true that once you go into labor you are limited on what you can eat and drink, but I didn't think my husband should be punished and starve because I couldn't eat.

On Pinterest I saw a "Daddy Hospital Survival Kit" filled with some candy, magazines, homemade bread, soda and some magazines. Although the packaging was very nice and included some cute printables, I knew my husband wouldn't really care about how nice it looked. I did package my version like a present (gift bag with tissue paper) so he wouldn't look through it before I went into labor.

I let him open his "Survival Kit" when we arrived at the hospital and were unpacking our hospital bag. My goal was to give him some snacks and something to do during the first night where I anticipated being in labor all night long. Once the baby arrived he would have plenty to do!

Here's what I included in my version of the "Daddy Hospital Survival Kit:"
  • Two magazines (fantasy football guide and a guide to phone apps)
  • Two Snickers bars (his favorite candy)
  • Peanut butter crackers (peanut butter for some energy)
  • Mountain Dew (for a lot of energy)
  • Angry Birds Cheese Nips (our nursery theme is Angry Birds)
No matter what you put in your "Daddy Hospital Survival Kit," make sure that you pack some snacks for yourself in your regular hospital bag for when you're done delivering your bundle of joy. Daddy will likely be happy with whatever you pack for him, but making it personal will make him feel special as well.

Tuesday, August 21, 2012

Week Nine: Make-Up Brush Holder

With our bathroom remodel, I've been looking for organization ideas for storage to keep the counter tops looking classy. I saw this photo on the left on Pinterest where make-up brushes are stored in a glass container with flat marbles.

I really liked the idea, but wanted to use whole coffee beans instead of flat marbles. It's turned out to be a fragrant pick-me-up in the morning when I'm putting my make-up on. My make-up brush collection isn't very large so I used a smaller container that I purchased for a dollar at the local Deals. I chose the cheapest hazelnut flavored coffee beans from Walmart for about $5. When the coffee beans stop smelling fragrant, I have a reserve to replace the whole beans as necessary.

This organization can be used for other items too! I'm using the same idea for my eyeliners as well.

Saturday, August 11, 2012

Week Eight: Final Pinterest Project, Maternity Photos

Alright, so it's not really week eight - I'm a little behind. But it's time for maternity photos, yay! Pinterest offered a variety of good ideas... and some (ahem) interesting photos. I had my brother and sister-in-law come over to take the photos loosely based off the ideas I showed them from Pinterest. We didn't research online, but here's a post about flattering maternity pics if you want some other ideas. Here's some of the inspirational photos from Pinterest.


Here's some of the more interesting photos I came across. (Note: I personally not a big fan of showing my stretch-marked belly, but it works for some women... and the husbands/boyfriends apparently.)


Through all the inspiration on Pinterest, here's some of the photos we saw, I liked the ones that were a little quirky, ones that included the family dog, and ones that included some portion of the nursery. We had two locations for the photo shoot: a trail with a lot of greenery and the nursery.

Our dog wasn't too interested in cooperating and the inspirational poses I found on Pinterest looked really awkward so we just winged it. My favorite photo is the one taken with a point and shot at a tilted angle (middle photo at left).


Tuesday, July 24, 2012

Food Taste Test: Mississippi Roast

I'm always on the hunt for a good/quick/easy meal to feast on and I found it with this Mississippi Roast recipe. It is literally the easiest thing I've ever made and it tastes FANTASTIC! Here's the instructions: Put chuck roast in crock pot, sprinkle with Hidden Valley ranch dressing dry mix packet, add Au Jus dry mix packet, a stick of butter, 5 pepperoncini peppers. Don't add water. Cook on low for 7-8 hours.

It was tempting to change up the recipe just a little bit, but I went by the instructions and it was tasty. Next time I would add in some carrots and onions - adding some much needed veggies in my diet.

Photo of recipe from Candis' blog.
I initially found this Mississippi Roast recipe through Pinterest, but there are more pictures (like the one in this post) and instructions on Candis' blog post.

Sunday, July 22, 2012

Week Seven: Final Pinterest Project Tub Cleaning

This week, I decided to clean my bathtub and even though the pictures aren't great, I think everyone can tell that this tub needed a good clean (see photo below). My inspiration was the tub cleaner solution from Pinterest (see photo to right) of equal parts white vinegar (microwaved for 90 seconds) and Dawn dish soap in a spray bottle swirled around. You're supposed to spray and let it set for one to two hours.

I didn't have Dawn dish soap so I took my chances with Palmolive. Although you can see from my before and after pictures that it actually does work, here are the lessons I learned from implementing this Pin this week.

  • Be really careful when pulling the vinegar out of the microwave, it's extremely hot.
  • Use a funnel when putting the vinegar and dish soap into the spray bottle, it's a heck of a lot easier.
  • The fumes are noxious! Be prepared for strong smells from the beginning. Even when you spray the tub and leave the bathroom, the smell will waft down the hall as you're letting it sit. Use a fan to help with the stench.
  • Let it sit for the recommended two hours. I only let it sit for one hour and did have to scrub a bunch. Either way, it was a lot less scrubbing that would have happened with regular cleaners I've used in the past.
PINTEREST success!!!

Sunday, July 15, 2012

Week Six: Final Pinterest Project

One of my good friends announced her engagement last week and I wanted to give her a cute gift that would help her with the wedding planning debauchery that is in her future. I went directly to Pinterest to see what other people had done, but there wasn't one idea that I really liked, so I incorporated a few of them.

First off in my bride-to-be basket, I included a few magazines. Barnes and Nobles had the best selection, but you have to go into one of their stores - looking at the magazines online doesn't cut it. They have a plethora of bridal magazines including local, national and international ones. I made my decisions based on my bride-to-be and what I thought she might need at this stage of the game: overall wedding ideas and themes.

Next, I wanted to get her something coffee related (motivation) and some wine (relaxation). I opted for these neat coffee pods that you pour brewed coffee and then freeze to make your own iced drink. For the wine, I chose a four pack of red wine - they're the perfect size when you just need to relax a little bit, but don't need the whole bottle. :)

One thing brides-to-be overlook (myself included!) is a ring holder for your new shiny hardware. My father-in-law works for a national jeweler and told me that I needed to make sure to take my ring off at night so the ring wouldn't be damaged by snagging on the sheets. Once I learned that, I have been diligent in taking my ring off at night, but I didn't think to get a neat ring holder for it. I think it's a must-have for any bride-to-be.

Lastly, I wanted to make something personal for my friend, that was also wedding informative. I created a wedding planning timeline bookmark with things that should happen during the planning process leading up to the wedding day. Here are the things I included:

----------

9+ Months Prior
Select date for your happy day!
Create a wedding board on Pinterest - if you haven't already.
Set budget - the average cost for a wedding in 2012 is $26,951.
Begin your guest list.
Select your wedding party.
Decide type of ceremony and venue.
Find reception venue - the # of guests may determine the venue.
Hire planner or day-of coordinator, if you want one.

6-9 Months Prior
Find caterer for reception - yay for taste testing!
Find florist, photographer and DJ or band.
Take engagement pics.
Choose wedding colors/theme.
Choose bridesmaid's attire.
Register for gifts - {insert fiance's name here}'s favorite part since he'll get to use the scan gun.
Order THE dress.
Create a {insert bride's name} and {insert fiance's name} wedding website.

4-6 Months Prior
Finalize guest list.
Send save the dates.
Decide on wedding invites.
Decide on location, date and time for rehearsal dinner.
Arrange hotel room blocks, if necessary.
Meet with your officiant.
Begin planning your honeymoon.

2-4 Months Prior
Mail invites - the number of invites you send out is about the # of people to RSVP.
Shop for wedding rings.
Test and order wedding and Groom's cakes - more taste testing!
Decide on day-of makeup and hairstyle.
Decide on and order wedding favors.
Get your marriage license - {insert info on the marriage license rules in the state your friend is getting hitched}

6-8 Weeks Prior
Mail rehearsal dinner invites.
Reserve groomsmen's tuxedos or suits.
Finalize the reception menu and flowers.

2-6 Weeks Prior
Create seating plan and wedding weekend timeline.
Have your final dress fitting.
Write vows.
Confirm details with all vendors - your planner/bridesmaids can do this.

0-2 Weeks Prior
Print seating cards, table cards and programs.
Give Best Man checks and tips to give to vendors.
Confirm arrival times of vendors - your planner/bridesmaid can do this.
Delegate tasks to wedding party - that's what friends and family are for!
Set aside time for yourselves - go on date with {insert fiance's name}, your last as a "single woman."

Created Especially for the Future Mrs. {insert bride's first name} {insert fiance's last name}

----------

There are a lot of things that can be added to the basket, or the personalize wedding timeline, that can make your basket even more special for your bride-to-be!

Saturday, July 7, 2012

Week Five: Final Project

With my baby shower approaching, I wanted to make some thank you cards that went with the theme of the nursery: Angry Birds. I happened to have a Groupon to Vistaprint, a website with a lot of cheap personalized items including note cards. Since there isn't a lot of baby Angry Birds items out there (as compared to other nursery themes), I decided to make my own thank you cards. With Vistaprint, since items are cheap, make sure you upgrade your envelopes, and get more of whatever item you order, since items tend to shift a lot during shipping.

Tuesday, June 26, 2012

Week Four: Final Pinterest Project

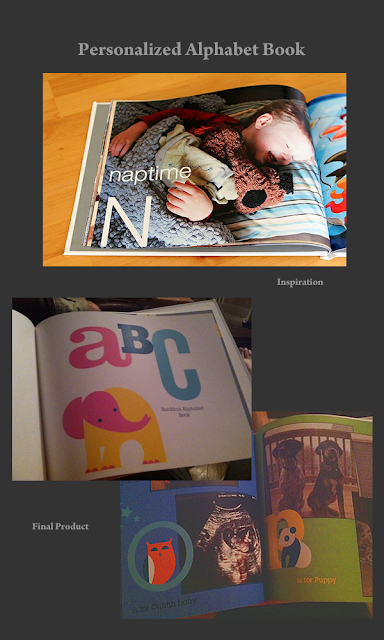
When I saw this alphabet book on Pinterest, I just happened to have an expiring Groupon for Shutterfly that I needed to use. In preparation for the book, I went to Facebook to pull down photos for the book and renamed them by what letter they were going to represent in the book. It was the most efficient way for me to choose photos, but I was having some trouble identifying things for some of the letters. C, I, and Y were difficult for me at the time to identify, but I only spent two nights working on this part of the task.

Once I had the letters identified, I went to Shutterfly and chose the book with pre-loaded alphabet settings, which made this Pinterest project a heck of a lot easier. I did have to move some of the letters around based on the number of photos I wanted to include, but their Customize feature allowed me to easily move the letters around and add embellishments as needed. (Note: make sure you check out any coupons online that you can apply to your order or any special deals they're running. Just search "Shutterfly coupons" in Google and you'll find a plethora of resources. You can do the same for the production site you use, or anything you order online for that matter.)

The focus of our alphabet book is more focused on what our baby can expect from our crazy family. :) I will definitely have a version two when the baby is a little older so I can include photos of him and how it relates to the alphabet.

Wednesday, June 20, 2012

Week Three: Finished Project

I saw this really cute watermelon train on Pinterest and wanted to try it for a BBQ I was hosting with some of my freight rail colleagues. I wanted it to be functional though and not just a pretty centerpiece.

Other than watermelon, the only other fruit I was serving for the BBQ was strawberries, so that helped decide the design of the final product. We'd just need one "railcar" to hold the strawberries. I purchased two watermelons from Costco, just in case one wouldn't be enough, or in case I messed up the first one. See the graphic to the right on how the watermelon fruit train came to life.

I was missing some serving platters, hence the foil platter. I would make that change for next time and also use more black licorice to make tracks underneath the kiwi fruit wheels.

Saturday, June 16, 2012

Week Two: Finished Project


We had our parents over for a
gender reveal party and wanted to have a fun way to reveal the gender of our first child. I had seen some cakes on Pinterest, but wanted to do something that was still edible, but something I could make myself.

What I did was make cupcakes and had everyone choose which gender they thought the baby was. Once everyone had a cupcake, they opened them simultaneously. Here's how I did it:

Monday, June 11, 2012

Week One: Finished Project

Well, almost a finished project. There's still room to grow. I had some pictures already framed and ready to go with the basic theme of having black and white photos in black frames. Now that didn't exactly work out as you can see some red in the photo to the right "Initial Layout" photo.

First thing's first with this project though - I needed to find the perfect letter. I started at Michael's first and found something that I thought might work, but it was a little small. It was already painted black so I bought it. The second stop was JoAnn's and they had a great variety of cardboard and wooden letters. I got the size I wanted and headed to Home Depot to buy black spray paint for under $1. They had matte and glossy and I chose glossy.

Once the letter was painted and dried, it was time to layout the photos. Some photos did not end up making the cut because they didn't have proper hanging hardware on them (I'll save that for another week's project).

I wanted the bottom three photos to be lined up along the bottom, so measurements were made so that the bottom of the frames were eight inches from the top of the mantle. My husband measured and tested out the spacing on the wall. As for the letter, we needed to make sure that you couldn't see gold nails sticking out, so I marked the top of the nails with a black marker so that it wasn't noticeable.

As you can see in the "After" picture, there's still a ton of space up there, but I'm seeing that as room to grow. Lesson learned on the picture frames that didn't make the cut too - even if you find good deals on the frames, make sure they have proper hardware installed for hanging, otherwise you have that obstacle in your way.

Thursday, June 7, 2012

Week One Task: Photo Wall

I saw this nicely organized photo wall with a letter for the family name and wanted to give that a try over our mantle. I already have the black and white photos in frames, so I just need to get the letter to decorate and organize the photos on the wall. Starting off pretty easy the first week - I think.

Wednesday, June 6, 2012

The Latest Addiction - Pinterest

My name is Ashley and I'm addicted... to Pinterest. Facebook doesn't do it for me anymore, now I find myself checking Pinterest a little too frequently to see what new things my network has posted. The first step is to admit you have a problem right? Although I'm probably not a hyper user as compared to my Pinterest brethren, I am currently at 22 boards, 496 pins and 66 likes.

I have decided that now is the time to actually start implementing some of these ideas that I find through Pinterest and discuss the implementation/usage/consumption here.